I gave an overview of the new PowerApps offering from Microsoft here, and now in order to dive deeper into the product, I think the best way to start is to build a PowerApp!
Business Case
So, you organization comes to you and asks you to build a mobile app for the Marketing department. Recently they have turned over the management of the company’s Twitter account to a new Marketing intern, and they are concerned that the possibility of an incidental tweet that might shine a bad light on the company might be posted. To prevent against this, they would like all new Tweets to first be reviewed by upper management for approval before they are posted.
This sounds like a job for PowerApps! Let’s get started:
Add your Data Sources
We’ll have 2 data sources for this App, one is an Office 365 account to send Email, and the Other is a Twitter account to post to. So in the PowerApps Web GUI, click the ‘Connections’ button on the left side of the screen, and click ‘Add a new Connection’. Create Connections for Office 365 Outlook, and Twitter, using the credentials that you have for those services.
Create a new Logic Flow
Right now in PowerApps preview, the functionality is split between the PowerApp Web based GUI, and the PowerApp Windows 10 App. Our first step will be to create a Logic Flow, which is only available in the Web GUI as of now.
A Logic Flow is essentially a workflow, that allows you to perform specific actions and conditions. Our Business requirement is to have an approval occur before a Tweet is posted, so we will build exactly that!

When you’re in the PowerApps Web GUI, you will see an option for “Logic Flows’ on the left nav pane. All of your logic flows that have been created will appear here. Since we haven;t created a logic flow yet, click on the ‘Create a Logic Flow’ button at the bottom of the screen. Choose the ‘Create from Blank’ option on the next screen.
Now we need to build our Logic Flow from the available options. Our goal is to run this Logic Flow when when a user submits a new Tweet, so we’ll start with the ‘PowerApps – When a control is selected’ action.

To help simplify creating this Logic Flow, we are going to first add all of the Actions and Conditions we’ll need, and then we will configure them. This will allow us to use the variables we create to post a Tweet, and add them into the Approval email we will send.

So, Let’s ‘Add an Action’ next, and keep loading actions until you get to the ‘Office 365 Outlook – Send approval email’ action.

Below that Action, add a Condition. In the left side of the condition for ‘Yes’, add an Action to ‘Post a Tweet’. Now, let’s configure the ‘Post a Tweet’ Action. Click in the Message Box, and then click the ‘Ask in PowerApps’ button. This will allow the action to pull in the Text when we wire up the Logic Flow with he PowerApp.

Your ‘Post a new Tweet’ action should now look like this:

Next, we want to configure the Condition we added earlier. In the case of the Condition, we only want new Tweets to be posted when it has been approved. So we want the Object Name to be set as ‘SelectedOption’ (The SelectedOption variable will come from the Approval email option we will configure next.) The Relationship will be “is equal to”, and the value will be ‘Approve’.

Now, lets configure our Email Options for when we send the approval email. In our requirement, we only need to send to a manager for approval, so just type in the manager’s email address in the “To:” field. Next, type in a descriptive message in the Body. You also have the option of inserting variables in the email as well. As you can see from my example below, I added some descriptive text, and then added the “Postanewtweet_Tweettext” variable in the body. That way, when it send the Approval email, the text of the tweet will be available for the Approver.

Once everything is configured, we just need to name the Logic Flow and Save it. This is done at the bottom of the screen. I named my Logic Flow, and then clicked ‘Done’ to Save it:

Create the PowerApp
Now let’s create the User Interface. Our Business Requirement only specified that the user has to compose a Tweet and submit it, so for this post, that’s all we’ll create. In the Next post, we’ll pretty it up and add more functionality.
So, Open up the Windows 10 PowerApps App, and choose the ‘Start from Scratch’ option

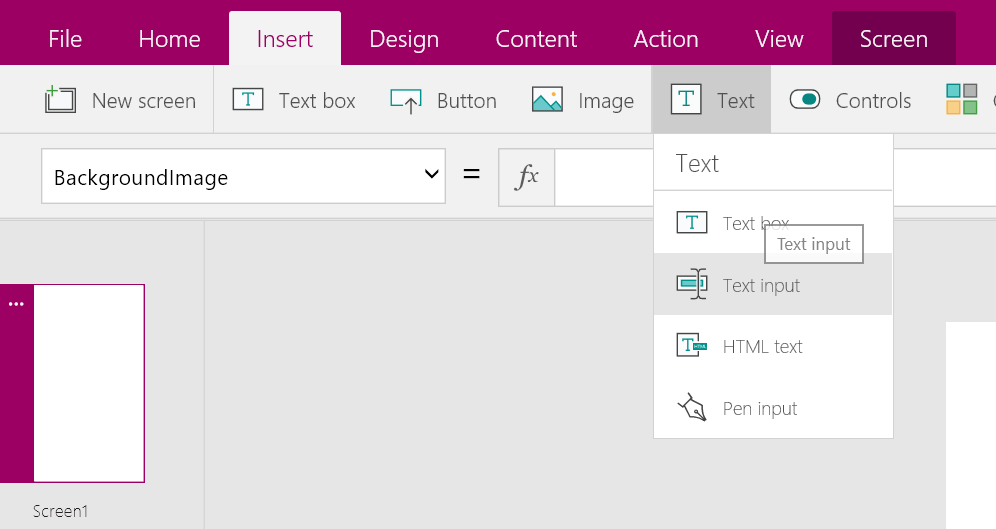
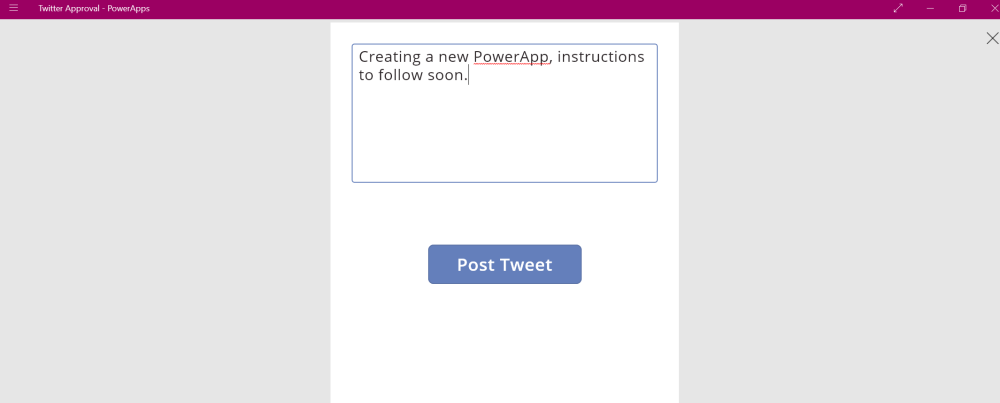
When you first get to the interface, you will notice that all you have is blank canvas. So, the first thing we will need to add is an area to compose our tweet. So, just click on the Insert tab on the ribbon, then click the ‘Text’ button, and then click ‘Text Input’.
Now we have a box that you can re-size to fit your needs. Below that, let’s ad a button, so we can submit the Tweet for approval. While on the Insert Tab, just click the ‘Button’ button. Once it’s added, you can move it below the text box. Rename the Label of the button to ‘Post Tweet’. We’ll also want to rename the button control. To do that, click the Content tab, then on the left click the ‘Button1’ control. In the ‘Rename’ box, rename the control. As you can see in my example, I have renamed it to ‘PostTweet’.

Your PowerApp should now look something like this:

Now, let’s wire up the ‘Post Tweet’ button to run our Logic App. Just click on your ‘Post Tweet’ button, and then click the ‘Action’ tab, and then click the ‘Logic Flows’ button:

A new pane will appear on the right side of the screen, which will show all of the Logic Flows available to you. Just click on the Logic Flow you want to add to the button:

Now, even though the Logic Flow has been added, it still needs the Parameters we specified when we created it. So, we now need to complete the formula that has been added. So, we need to pass the text in the PostTweet Input box over to the Logic flow. To do this, add the following parameters after the Run command: Text(PostTweet). The end result will look like this:

Congratulations! You just made a PowerApp that will let users compose, submit, and approve/reject Tweets! Now you can try it out. Just hit F5 to run the PowerApp, type a new tweet, and click ‘Post Tweet’:
Now, check the mailbox of the user you put into the Send Approval portion of the Logic Flow, you should see an email that looks like this:

Click the ‘Approve’ button in the email, and then check the Twitter account:

Conclusion
This is obviously some very simple functionality, and we didn’t take into account things like “What happens if it’s rejected? or “How do I know anything happened after I clicked ‘Post Tweet'”? We’ll build off of this functionality in the next post, and pretty things up a bit.
Also….
If you are currently working with PowerApps Preview, SAVE OFTEN!!! There is no autosave, and the Windows 10 App has a habit of crashing on me. Now, it’s true that I am on the latest preview of Windows 10, so not sure what is causing that, but until an autosave feature is added, SAVE OFTEN!!!!
