So, here’s the user story: You have a list that contains some time sensitive material. In this case you want to make sure your users complete a particular task on time, and if they don’t, make sure they get notified after 1, 3, and 5 days after the due date has passed. How can we leverage SharePoint workflows to accomplish this? Let’s build it!
You must use SharePoint 2013 Workflows
We’re going to be calling a loop during this workflow, so it’s imperative that you use Sharepoint 2013 workflows, as opposed to SharePoint 2010 workflows. Go ahead and open up SharePoint Designer, and let’s create a new Reusable workflow:\
(NOTE: For the purposes of this example, I am using a Task list that has an “Assigned To” column, and a “DueDate” column)
Stage 1
Here’s an overview of the Stage 1 portion of the workflow. I’ll discuss each step and explain it’s purpose:

Variables
There will be a few variables we’ll need to get this workflow started. You have the option of either creating them now, or as you create each action/condition. This is really all about personal preference. When you’re creating a workflow from scratch, it can be easier to declare them as you go, as you may not know up front the exact variables you will need. For the purposes of this example, I have laid out the variables I have used:
| Name | Type |
| dictionary | Dictionary |
| responseCode | string |
| JSONResults | Dictionary |
| dataset | Dictionary |
| count | integer |
| index | integer |
| Index Plus One | Number |
| calc | Number |
| date | Date/Time |
| resultId | string |
| resultAssignedTo | string |
| resultDate | Date/Time |
Pre-Loop Workflow Actions
Our first step will be to build a JSON Dictionary, that will allow us to pull in information from a SharePoint list and store all the results. So, In Stage 1, go ahead and insert a ‘Build Dictionary’ Action:

Click the blue ‘This’, which will allow us to define the items we need to pass to construct our headers to pass to SharePoint for JSON. In this case there are 2 items:
| Name | Type | Value |
| Accept | string | application/json;odata=verbose |
| Content-Type | string | application/json;odata=verbose |
We can keep the default output to Variable:dictionary. Our next step will be to call the SharePoint list by using the Call HTTP Service Action:

Click the blue ‘This’, which will allow us to define the REST endpoint for the SharePoint list we want to query. There are a few different parameters that will allow you to filter or select different columns in order to refine the type of information you are resturning. This can greatly help performance for large lists, and I highly recommend looking at different ways to accomplish this if you can. In our case we have a very small list, so we’ll just return all of the data. To form the URL you will need, use this example. We’ll be calling the SharePoint API to get the list, and then all the items. If your list is in a sitecollection or subsite, provide the full URL:
https://<yoursite>.sharepoint.com/_api/web/lists/getbytitle(‘Tasks’)/Items
We will want to change the blue “responseHeaders” to hold our JSONResults variable, and then we will want to modify the Properties of this action (If you hover over the far right side of this action, you will produce a drop down arrow. click it, and then click Properties)
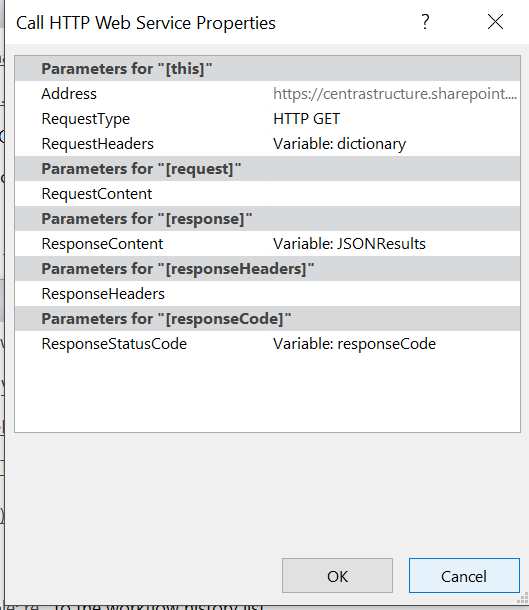 For the properties, we will want to modify the “RequestHeaders” property to contain our ‘dictionary’ variable. This now allows us to send the Headers we defined in our Build Dictionary action to the REST endpoint, and it will return the JSON we requested based on those headers. It’s a bit convoluted but if you;re familiar with JSON, this should look pretty familiar.
Next, we will add a ‘Get Item from a Dictionary’ action.
The Format that SharePoint returns list items in, is in a JSON hierarchy. The beginning point of the hierarchy that we want og grab is ‘d’. The next level in that hierarchy is ‘results’. So click the blue ‘this item’ and type in d/results. We want to get these from our JSONResults Variable, and output it to the dataset variable:

Now that we have all of our list items in a dictionary, we need to prepare to loop through each one. Let’s add a ‘Count Items in Dictionary’ action. We want to Count the items in the dataset variable and output it to the count variable. This will allow us to store how many items are in our results:

Now we want add a ‘Set a Workflow Variable’ Action. We want to set the index variable to ‘0’., This will give our loop a starting point.

The last action we will add will be to define the interval we wil want to notify on between today’s date and the due date. For this Stage, we want to be notified if it has been one day since the due date. Let’s add the ‘Add Time to Date’ Action. We’re going to add -1 days to the current date, and out put that to the date variable:

Nice, now we’re ready to add the Loop!
Loop Actions
Since we want to Loop through all of the items in our list, we want to go ahead and Add a ‘Loop with Condition’ in SharePoint Designer. Change the values of ‘The content of this loop..” so that the index variable is less than the count variable:

The next thing we will do is get the ID’s of all of the items in our results so we can log them in the history list during the loop. This is good practice for troubleshooting. So let’s add a ‘Get Item from a Dictionary Action. In this case we want to get the ID of the current item being looped from our JSONResults dictionary and output it to the ‘resultId’ variable:

Now that we have the ID, next we want to get the DueDate of the current item being looped and output it to the resultDate Variable:

Next we want to add the ‘Set a Workflow Variable’ action, so we can get the email address of the person whom the task was assigned to. We’ll set the resultAssignedTo using the string builder to find the emails address of the Person who it was assigned to based on the ID of the item currently being looped. Here’s the String builder parameters:

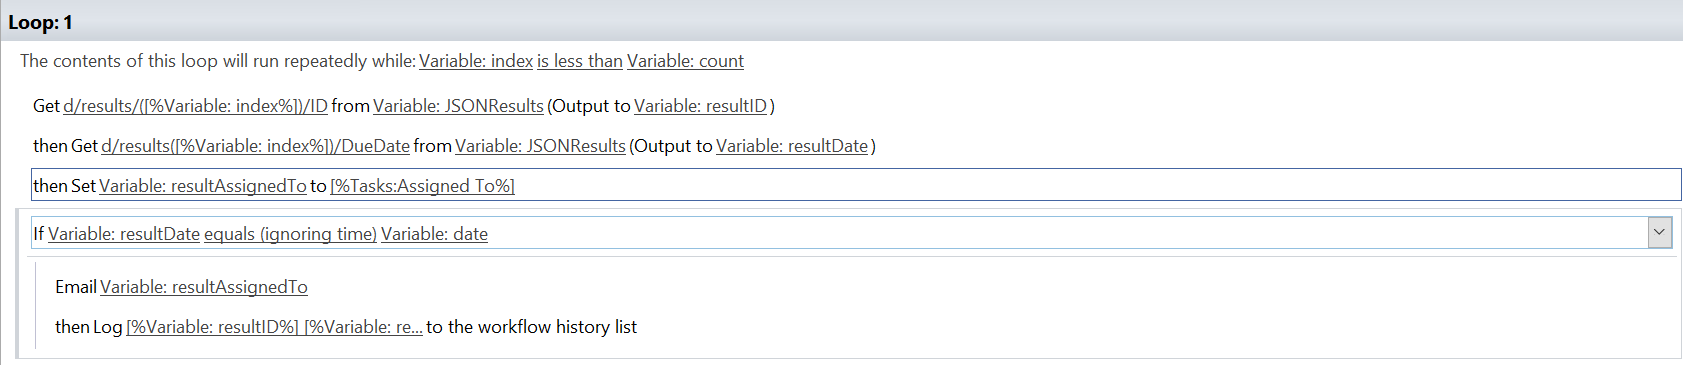
Now we’ll finally add our first Condition! In this case we’ll want to compare our resultDate with our date. If they are equal, we’ll send an email. So add a Condition ‘if any value equals value’:
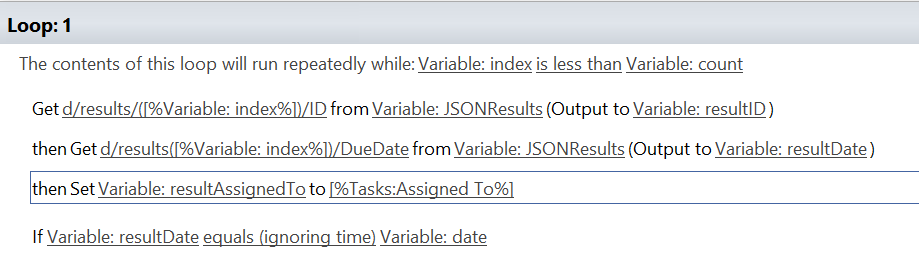
We’ll want to change the equals to ‘equals (ignoring time)’. We’re not concerned with the exact time, just that the dates match.
Now we just need to send an email to the user this task is assigned to. Go ahead and add the ‘Send an email’ Action. Click ‘these users’, and in the To: field, add the resultAssignedto variable. You can also customize the subject and contents of the email to match what you would like to inform the user of.
(NOTE: After sending the email, I also like to log the resultID and resultAssignedTo to the workflow history list. This can be very beneficial in troubleshooting either the workflow, or in case the email gets caught by a spam filter.)
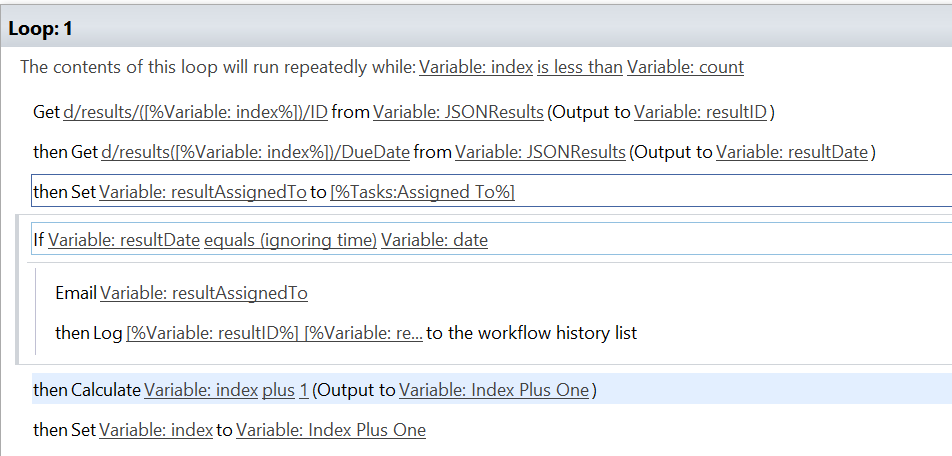
As the last part of this loop, we just need to finish up the calculations, so the loop with continue until it has gone through all of the list items. To do this, Add a ‘Do Calculation Action outside of the Condition block. We want to calculate the index variable plus 1 and output it to the ‘Index Plus One’ variable:

Lastly, as a part of the loop, we will ‘Set a Workflow Variable’, and set the index variable to the Index plus one variable. This is incrementing the count of items looped so the loop will know when to stop:
Stage 2
As the last part of this workflow, we will want to set it up to Pause after it has run through all of it’s conditions and actions. Since we want it to run on a daily basis, we will set it to Pause for a day. To set this up, just add a new Stage to the workflow, and then add a ‘Pause for Duration’ Action. Set this to be 1 Day. In the Transition to Stage area, set it to Stage 1, and in the Stage 1 Transition to Stage area, set it to Stage 2. This essentially adds the entire workflow on a permanent loop (though not a bad loop).

Finally
As we explained int he user story, the goal was to set this to run on 1, 3 and 5 day notifications. I didn’t set all 3 of those up in this workflow, but it can be done very easily. You can either just Copy and Paste Stage 1 as Stage 2, and Stage 3, and then modify the Add Time to Date Action for each of those additional stages, or you can keep everything in Stage 1 and just additional variables to store the additional dates (i.e. date3, date5) the same as we did foir the ‘Date Variable. Then you just need to modify the condition to check those variables in addition to the date variable.

I hope you found this workflow useful!
