Click here to review Part 1 of this series
Additional Business Requirements
So, we gave our new PowerApp to the Marketing team, and after using it a few times, they have now come back to us and asked for some additional things.
- After I post a tweet, how do I know it has been sent for approval? Can we add something to let me know?
- Is there any way I can view all the tweets I’ve posted on Twitter in this App
So, with these new requirements in hand, Let’s tackle each one:
Post Tweet Notification
So, for our first requirement, the Marketing team just wants to know that when they click the ‘Post Tweet’ button, it actually did something. We can solve this issue fairly easily by switching the view to a different screen when we click ‘Post Tweet’.
So, the first thing we will need to do, is to create a new screen. Just click on the Home Tab, and then click ‘New Screen’.

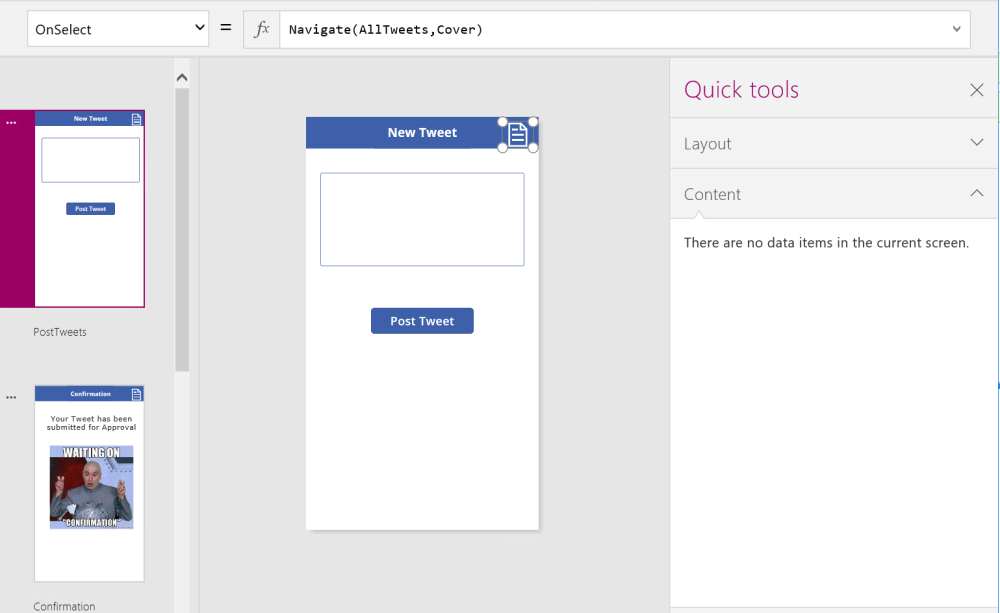
This will add a new blank screen, where you can add the necessary text to let the user know that the Tweet has been submitted. Also, I recommend changing the name of the Screen to something more descriptive. In my case, I have renamed it to ‘Confirmation’. In this image, you can see my modified Confirmation screen:

Now we just need to tie the new screen, to the ‘Post Tweet’ button. With PowerApps, we can add more actions to a Button, by separating them using a Semi-Colon. So, after we post a new tweet, we will “Navigate” to our “Confirmation” Screen by fading in. The Command on the ‘Post Tweet’ button will look like this:

Once that has been added, you can try it out! One requirement down, 2 to go.
View all of your Tweets
So, the user would like to see everything they have already posted, as to not retweet the sames things more than once. Let’s add a Twitter feed!
So, let’s start out by creating a new view, and changing the view’s name to ‘AllTweets’

With our blank canvas, let’s use one of the Pre-set Layouts to help save us some time. Just click on ‘Quick Tools’ in the bottom right of the app, and then click on Layouts to view the available layouts we have.

For this screen, I chose the ‘Browse Items, header, subheader, and description’ layout, but you can certainly experiment with any of them to find the one you think will work best for you.
Now that the layout has been applied, we just need to wire-up the layout with our Twitter data source. Just click on the layout, and find the Items property in the formula bar. In the Formula bar, type in: twitter.Usertimeline(“username”, {maxResults: 5})

Replace “username” with the User you would like to see. (NOTE: I have added the maxResults option to my formula. This will only return the latest 5 tweets. If you want to see all of your tweets, just omit this option).
Once this has been added, you will notice that by default, it shows things like tweetID, and Created Date. Also, the formatting seems to cut off the tweetText. Try re-sizing the various elements on the page. To change the fields shown, just click the layout, and then click the ‘Options’ button in the lower right side of the App. From here, you can define the exact fields to be shown:

For my Page, I am only showing ‘Tweetedby’ and ‘TweetText’. I also changed the label at the top of the screen to ‘Twitter Feed’. (NOTE: by default, ‘Search Items’ does not function. We will save this for a later post.)
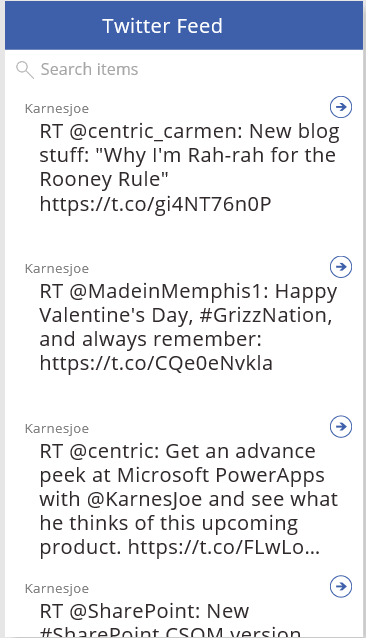
Congratulations! You now have a screen that will show the Twitter feed for the specified user! This example will only show a specific ‘hard coded’ user feed, but variables could be added to make this more dynamic.
To help with Navigation, Add an Icon to the Right side of the Blue Bar on the layout. I added a + icon to denote Posting a new tweet. 
After the icon is added, just choose the OnSelect method in the formula bar after you click on the icon. I set it to navigate to the PostTweets Screen when selected:

Also, I went ahead and added the Blue bar in our layout to the PostTweet and Confirmation screens. I added an icon to denote navigating to the AllTweets screen:
Now we have full Navigation capabilities between all 3 screens!
While there are a few limitations with this current app (You’ll notice the links are not clickable, and there seems to be no way to bring in images for users), it does provide some very good functionality. Remember this is still in preview, and the API to Twitter is still most likely in Development.
Speaking of API’s, in our next blog post we’ll tackle how PowerApps leverages your Azure Managed API’s for it’s connections, and we will see how we can REALLY extend the functionality of PowerApps beyond the OOTB API’s like Office 365, Twitter, and Dropbox.
