I think one of the biggest roadblocks for users converting from InfoPath to PowerApps has been the lack of any Printing support inside of Powerapps. While I believe the support is in the Pipeline for PowerApps, it is possible to create Printable Forms in Powerapps today!
It’s not the cleanest path to Print, so bear with me
So, I have a simple 2 Screen for in a PowerApp I have built, and I want users to be able to print the form after it has been submitted. Here is what my form looks like:
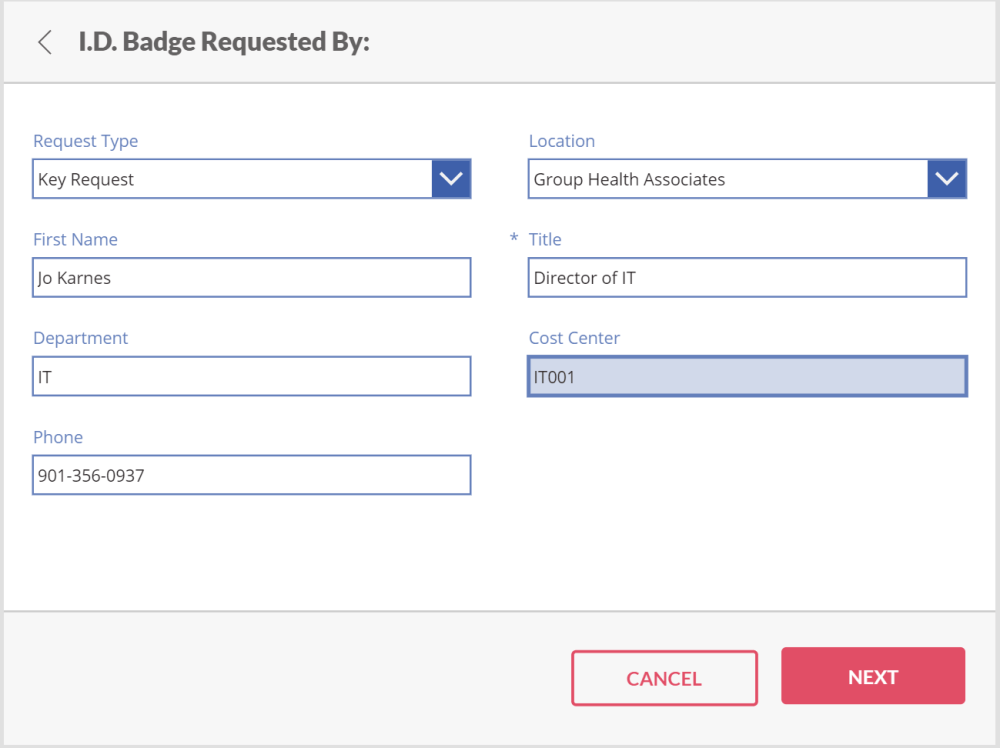

It’s a pretty standard Form for a Badge Request. So now, how do we get it to Print? The answer lies with HTML and Microsoft Flow.
My First Step is to add a ‘Print Form’ button on the First Item in my Requests Gallery. I used a simple Icon for my “Button”.(Make sure you insert it into this box, so the icon ties itself to each Item in the gallery)

Next, you will need to generate a Printable view of your Form from HTML. You can use any HTML tool to do this (You can even copy and paste the HTML Code from InfoPath if you are migrating a form, and you had a printable view in there). For this example, I created a simple 2 Column HTML Table, and replaced the 1st column with all of my Display Names for my Form. We will be adding the Values for the Right column in the next step. (Special Thanks to html-online.com for the easy and free HTML Generator)

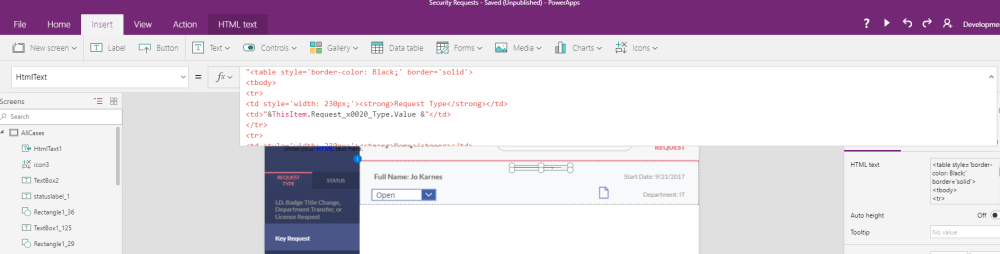
Back in your PowerApp, Insert an HTMLText Input box into the first Item of your Gallery, and change the Visible Property to false. For the HTMLText Property, copy and Paste your HTML Code between the “” (NOTE: If your HTML Code uses double quotes, do a find/replace and replace double quotes with Single quotes). We can now insert the values of the form into the second column. For Example:
<td style=’width: 230px;’><strong>Request Type</strong></td>
<td>”&ThisItem.Request_x0020_Type.Value &”</td>
Notice, I am coming out of the closed quotes, and then appending the current items’ Request Type Value, and then appending the other HTML Again.
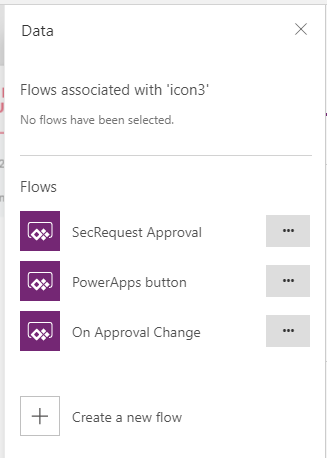
Now, I have my HTML Form which will have all of my values. Next I will create a flow for this Icon, but selecting the Icon, and clicking the ‘Flows’ button on the top Toolbar. I will create a New Flow for this Button.
I have named my Button ‘Send Printable Form, and I will be sending the HTML in an email. Add the Outlook 365 ‘Send an Email’ action, and fill out the settings. The two most important things here are to make sure you use the ‘Ask in PowerApps’ for the Body, and Change the ‘Is HTML’ to “Yes”

Click Create Flow, and switch Back to your PowerApp, and then click the New Flow you just created to assign it to that button:

In the Formula Bar, pass any of the Variables you defined in Flow. In my Case, I will be sending the First Name (Which will be added to the Subject), and HTMLText2.HTMLText (Which is my HTML Text Box, and the HTMLText Property of that Box).

Now just Preview the App, and Click your Print button. You (or whomever was in the To: field of your Flow), will receive an email with a filled out Form which you can print!

NOTE: Because this is HTML, you can customize the look and feel as much as you want.
BONUS: If you hate printing out of your Email Client:
You can also take that HTML content and Just add it to an HTML File! In my Case I saved all of the content out to an HTML File in my One Drive For Business by adding an extra Step to the Flow: 
Now when the flow runs, I can simply download and open the HTML File from my Browser and print it from there: 

In Conclusion
I hope this is something you may find useful, especially if you have a strong need to print. Please check out some of my other articles to take a deeper dive into the product, and as always, please feel free to reach out to me at jo.karnes@centricconsulting.com

If you sync the library to a computer, you could add a Powershell function to listen to the library and then print any new items to the local printer.
LikeLike
This is a great workflow, especially saving the html file to one drive directly.
I’m curious though if you have any thoughts on how to print all rows in a collection / data-set? I’m trying to make full overview reports as well as detailed reports.
LikeLike
There’s not really any elegant way, you most likely would have to use the Concatenate function to get them out of the table and into strings…
LikeLike
Jo,
I was able to successfully use the Concat function to get each of my rows of data to enumerate based on the incoming dataset. The styling is not perfect and not nearly as easy to do as SSRS, but until Microsoft can find a way to do this for us Natively in PowerApps, I will continue to develop in this schema. See a snippet below:
Title
Chinese
teaching stations
total spaces
each room
total students
each room
sub total
“&Sum(activeProjectRooms,teachingStations*1)&”
“&Sum(activeProjectRooms,totalSpaces*1)&”
“&Sum(activeProjectRooms,studentsTotal*1)&”
“&Sum(activeProjectRooms,netSMsubTotal*1)&”
“,
Concat(SortByColumns(AddColumns(Filter(activeProjectRooms,rStatusID=1),”titleAndSort”,Concatenate(Text(sortingID),”. “,Title)),”divID”,Ascending,”depID”,Ascending,”sortingID”,Ascending),
”
“&titleAndSort&”
“& cn &”
“&teachingStations&”
“&totalSpaces&”
“&studentsEachRoom&”
“&studentsTotal&”
“&netSMeachRoom&”
“&netSMsubTotal&”
“),”
LikeLike
Hi i have a Problem to bring the values from the html box in the E-Mail, i try to replace the double quotas but the E-Mail bring the Html Text without values
”
DataCardValue27.Text
Titel
‘&ThisItem.Request_x0020_Type.DataCardValue27.Text&’
”
Maybe in Europe is the quotes roule is diffrent i dont know.
LikeLike
Jurgen,
See my post above on an example of how I setup the dataset. Maybe that helps? It seems that where you have your ‘&….&’, it should actually be “&….&”.
LikeLike