So, I recently had a colleague of mine come to me with a requirement for a PowerApp he was building. The customer wanted to be able to click a button in PowerApps, and export a SharePoint list to a CSV file. “I can do it through Powershell, but they want to be able to just click it in PowerApps. Is this possible?”
Now, you’re probably thinking: “Wait, the title of this blog says ‘Mobilize Exchange Online’, why are you bringing up a SharePoint requirement?” This is because when I was digging through everything and trying to work out a solution for this, I realized a couple of caveats:
- I wanted to use the latest Azure Functions runtime when doing this post, and the current version of the SharePoint Online Powershell modules don’t really work with Powershell Core 6 (Which Azure Functions runtime v2 uses)
- The Exchange Online Powershell Modules do (more or less) work, and I actually had my own use case for this with a client I’m currently working with, so I opted for this example instead 😁
The Requirements and The Technologies
So, in my case, I have a client who wants to cancel any meeting that a departing user has scheduled. Honestly, this is a real easy Powershell command:
Remove-CalendarEvents -Identity <user> -CancelOrganizedMeetings
But, in order to run this command, I have to be in front of my PC, logged into Exchange Online through Powershell. Personally, I’d much rather just be on my couch, grab my phone, select the user, hit a button and be done. I’m lazy like that. So, let’s make a PowerApp to do it!
Azure Functions
Azure Functions are a serverless way of running chunks of code to perform specific Functions. (it’s aptly named). Basically, write your snippet of code, deploy it to an Azure Function, and Call it through it’s published endpoint. Basically a really fast way to get an API going in the cloud. In the first runtime for Azure Functions, it published a version of Powershell 5.1. Going this route, you could most likely accomplish the first use case in this blog, but I wanted to try out the latest version of the Azure Functions runtime, which includes a “Preview” of writing Powershell and leverages the Powershell Core 6 platform.
Flow
Now, because w’re going to be calling an HTTP endpoint, the easiest way to call this (without creating a custom connector), is to use Microsoft Flow to pass the parameters we want as a POST to the Azure Function.
PowerApps
Lastly, we’re going to use PowerApps as a UI, so I can select the user in question, and hit a big button to cancel all of their meetings
The Big Caveat
I want to stress, everything we’re going to do in this blog is to prove out some key concepts, this is NOT the best way to go about all of this, as there are security and governance concerns I’m not going to delve into for this. But, during the walkthrough, I will call those out, and provide some resources to you, so if you want to do this on your own, you can make the decisions best suited to your needs. Part 1 of this blog will be building the Azure Function, Part 2 will be building the Flow and PowerApp.
Without further ado, Let’s build!
Building The Azure Function
So, if it’s not apparent that Azure Functions are hosted in Azure, well, they are 😁. So for this part, you will need access to an Azure Subscription (either a trial, or paid one). There are a lot of different way we can go about creating an Azure Function. For brevity, I’m going to just do this directly through the portal, but you can get full instructions on how to deploy function here: https://docs.microsoft.com/en-us/azure/azure-functions/functions-deployment-technologies
So, to start, open up the azure portal at https://portal.azure.com, and search for either “Function App, or go to All Services -> Compute -> Function App

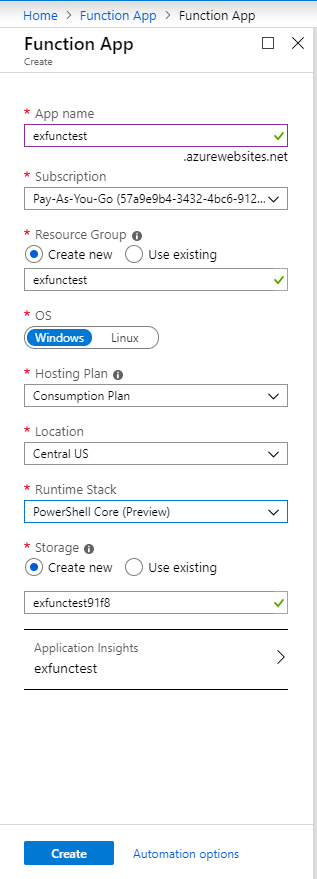
Let’s start by Creating a Function App. A Function App is a container that will hold all of your associated Azure Functions. So, if you wanted to create numerous different PowerShell scripts, you could group them altogether in one function App. This would allow you to only have to save the MSOnline PowerShell module one for all of your Functions. As you can see to the right, I’ve given my Function App a name, created a new resource group, and I’m hosting it on Windows. For my Hosting Plan, I chose ‘Consumption Plan’, since this is a test, I won’t be consuming very much, so the cost is negligible. Also, I’m using Powershell Core for my runtime, for reasons I explained at the beginning of this blog. When you have everything set, just click Create.
Once the Function App has finished creating, our next step will be to add the MSOnline Powershell module, so it can be used in our Function. So, Click on the Function App, and then click on Platform Features:

Under the Development Tools section, click on Console (CMD/PowerShell)

This will open a Console, that can run either CMD or Powershell, click on the PowerShell button to switch to a Powershell Console.
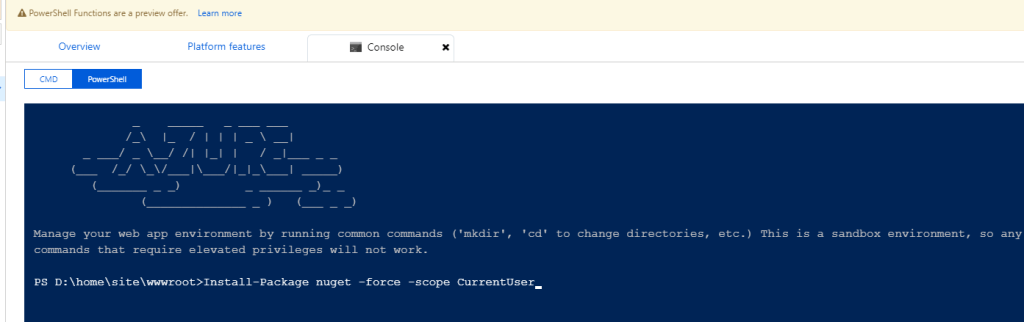
Execute the following Commands:
Install-Package nuget -force -scope Current User
mkdir ./Modules
Save-Package -Name MSOnline -Path ./Modules
These commands will install Nuget into the session, create a new directory name ‘Modules’ and save the latest MSOnline Powershell Package to that directory.
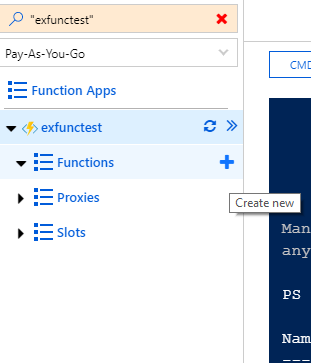
Next, we will create a new Azure Function. Just click the + sign next to Functions to get started:
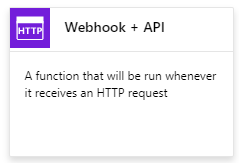
The Type of Function we will be creating is a WebHook +API, so choose that during the wizard and click Create.
Once the function has been completed, we will replace the existing PowerShell script on the Run.ps1 page with this:
using namespace System.Net

# Set a parameter
param($Request)

# Instantiate Credentials
$username = <username>
$password = ConvertTo-SecureString <password> -AsPlainText -Force
$psCred = New-Object System.Management.Automation.PSCredential -ArgumentList ($username, $password)

# Import the MSOnline Module and establish a session to Exchange Online
Import-Module MSOnline
$Session = New-PSSession -ConfigurationName Microsoft.Exchange -ConnectionUri https://outlook.office365.com/powershell-liveid/ -Credential $psCred -Authentication Basic -AllowRedirection
Import-PSSession $Session -DisableNameChecking

#Create a variable to pass a value from the Request to Powershell

$identity = $Request.Query.Identity

# Cancel the Calendar Events of the User
Remove-CalendarEvents -Identity $identity -CancelOrganizedMeetings -Confirm:$false

#Compose an HTTP Response to send when the command is run

$HttpResponse = [HttpResponseContext]@{
 StatusCode = 200
 Body = "Success"
}

#Send the Response back

Push-OutputBinding -Name Response -Value $HttpResponse

#Terminate the Exchange Session
Remove-PSSession $Session
Now, this script will create a Request Parameter, add your credenetials to variables, Import the MS-Online Module we just added, create a new conenction to Exchnage Online using the credentials we specified, create a new Query variable so we can pass the name of the user we want to cancel, Cancel the meetings, send a Response code, and the terminate the Powershell session.
NOTE: I really want to impress upon you that this is not a script you should ever use in a production environment. Credentials should never be hard coded into your script. You will most likely want to use Managed Identity for User Identity, and then secure the function using App Service Authentication. Both of these will probably be their own blog posts, so stay tuned, or check the Azure Function documentation on Microsoft’s site for more information.
Once the script has been added, you can Test it out right in browser. Just open the Test pane at the far right of the screen. Set the HTTP Method to POST, Add the Identity Query and add a Test User as a Value. (I had added a test user to my tenant and had them send a bunch of test appointments to other people). We don;t need a Body, so just click Save and Run at the bottom of the screen.

When it runs, you can open up the Logs at the bottom of the screen, and you should see output similar to this:
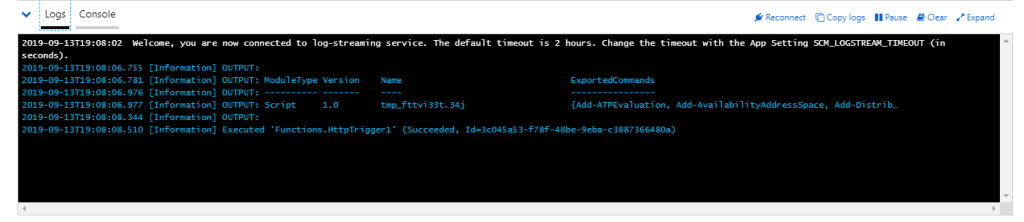
Also, all of the Meetings from the Test user should now have sent out cancellations! If you run into any issues, please verify that the user you used for your credentials has enough access to Cancel Meetings (Exchange Admin).
I hope this helped provide a good introduction into using Powershell with Azure Functions. In the next post, we’re going to call this Function using PowerApps and Flow, to truly mobilize the functionality. As always, please feel free to reach out to me at jo.karnes@centricconsulting.com if you have any questions.

One Comment Add yours